Things You'll Need
Selected tools/components
Brass rivets
Aluminium alloy spacers
Flat steel springs
Brass flange bushings
Handle sides
Blade sharpener
Nippers
Laser reflecting goniometer
Small hammer
Vice
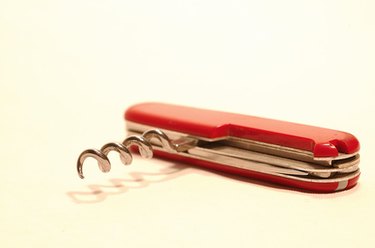
In 1891, Karl Elsener set out to manufacture knives for the Swiss Army. Today, these iconic pocket-sized knives are world famous for their multi-tool combinations, with specialty blades such as cork screws, nail files and scissors. To ensure the Swiss Army Knife meets all your requirements, you can make one yourself. It's challenging but not impossible. The components are available for purchase several from manufacturers; all you have to do is put them together.
Preparation
Step 1
Decide what size of knife you want. The standard Victorinox Swiss Army knife is approximately 91 mm long and 20 mm wide. Their smaller models are typically about 58 mm long and 15 mm wide. Wenger Swiss Army knives typically use 65 mm, 85 mm and 130 mm lengths.
Video of the Day
Step 2
Select the tools you feel will be most useful. The most common tools, besides knife blades, include tweezers, toothpick, awls, can openers, cork screws, slotted screwdrivers, phillips-head screwdrivers, nail files, scissors, saws, files, hooks, magnifying glasses, ballpoint pens, fish scalers, hex wrenches, pliers, and key rings.
Certain components may be harder to come by than others so just in case you have to source it from scratch, make a note of the raw materials
The knife's cutting blades are made from stainless steel with a Rockwell C (unit of hardness) of 56. The saws, scissors, and files have a hardness of RC 53; can openers and awls have RC 52; and corkscrews and springs have RC 49. The internal spacer strips are made from aluminium alloy (to make them light), and the rivets and bushings are made of brass.
Step 3
Identify your preferred handle sides (or "scales). Although red-handled Swiss Army Knives are most common, there are many colors, textures and shapes to choose from.
Assembly
Step 1
All your components will be placed on several brass rivets. The first components are generally an aluminium spacer and a flat steel spring, followed by a layer of tools. The can opener, awl and flat metal screwdriver are generally the first tools installed. A hook and a pair of scissors are often placed on the second layer and so on. This process is repeated until all the desired tool layers are incorporated and the finishing spacer is fitted.
Step 2
Once built, fasten the metal parts by adding brass flanged bushings to the rivets. Use nippers to cut any excess length of the rivets to make them flush with the bushings and then flatten them with a small hammer.
Step 3
After the assembly of the metal parts, the blades are sharpened to a 15 degree angle, resulting in a 30 degree V-shaped steel cutting edge. The blades can be checked with a laser reflecting goniometer to verify the angles.
Step 4
Flat press the handles onto the bushings until they are tightly secure. Finally for extra measure, place the assembled knife in the vice and tighten to firmly press the compiled tool together.
Tip
One component to strongly consider is the sewing eye. Its utility cannot be underestimated, as it is extremely handy when camping or repairing wardrobe malfunctions.
Warning
Due care and diligence must be undertaken when handling sharp metal blades and components.
Video of the Day